How to edit a password protected Word document

This is the situation: You opened a word document, but then realize you cannot edit it because it is password protected from editing. Now you basically want to crack the password protection for editing in Word or remove the read-only lock for the case that you cannot recover the password. Cracking a password! Sounds highly illegal? That certainly depends on the situation. You can always break into your own house when you lost the keys. Similar case here.


I created a form document years ago and protected it from editing so that only the form fields can be edited. Now I needed to make some updates to the form and – you can guess – cannot remember the old password. So I could either write up the entire 10-page document again or try to remove the password protection. Typing it up would have taken me hours with all the formatting. To find the solution, however, took me only 30 minutes. Time saved, yeah! I want to share this solution with you so that hopefully it takes you less than five minutes: (more…)

Remove Field Codes in Word

Field codes link to content inside or outside of documents (e.g. a table of contents). When this content is moved you’ll get a “Error! Reference not found.”, which at this point if you are not the author of the document makes it impossible to guess what the text may have said before. This is why it is advisable to remove field codes entirely before you distribute a final document to make sure important information is not lost.
 

The fastest way to do this is to select all text with CTRL + A and then press CTRL + SHIFT + F9 to remove all field codes. To remove field codes located in headers and footers (e.g. page numbers) you will have to click these separately and repeat the procedure.


More about field codes


March 14th, 2013|Tags: , , |

How to toggle field codes on or off in Word

This is another issue that keeps coming back over and over again. Field codes normally look like normal text unless you move parts of the text, which may then result in an “Error! Reference not found.” message instead of the text (further down I’ll show you what field codes are if you don’t know). It would be thus very handy if we could make the field codes visible aka toggle field codes on and off.


Toggle Field Codes

The quick way to toggle field codes is using the keyboard shortcut: ALT + F9.


Word Options

The more complicated way is going via the Word Options (more…)

Office Ribbon disappeared

I am not talking about the fact that someone snatched your office fatigue awareness ribbon (which should be bland-colored for sure) from your desk. I am talking about the tabbed toolbar which appears in many Microsoft office applications. You can see some examples of Microsoft office ribbons here:

Word Ribbon

Excel Ribbon

You can toggle it on and off by pressing CTRL + F1.

So if it disappeared, just try this combination and you will get it back.


November 20th, 2012|Tags: , , , , |

Sort alphabetically in Word

You can quickly sort any one-level list (bullets or numbers) and sequence of paragraphs alphabetically in Word:

1. Highlight the list

unsorted list
2. Clicking on the sort button (Home tab -> paragraph group)

sort button

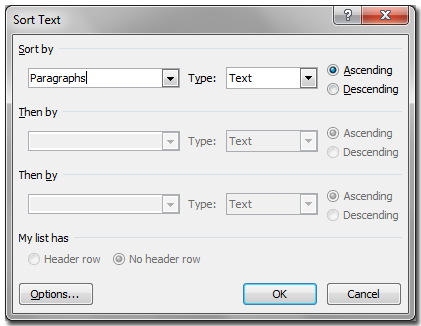
3. In the opening sort text window select paragraphs and under type select text and press ok

sort text window
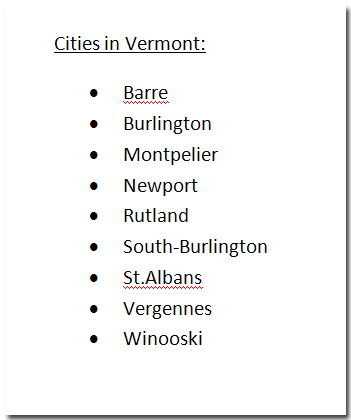
This is the result: An alphabetically ordered list of the cities in Vermont


sorted list


BTW, a paragraph ends with the ¶ -character (end of paragraph sign or pilcrow). If you cannot see formatting signs like this one you can toggle them with the ¶ button next to the sort button.


Related articles:


November 19th, 2012|Tags: , , |

Select Text in Word

The two methods to highlight or select text in Word are using either the mouse or the keyboard. These methods also work in the most text based applications (Wordpad, Text Editor, Power Point, Internet pages)


Using the mouse to select text in Word

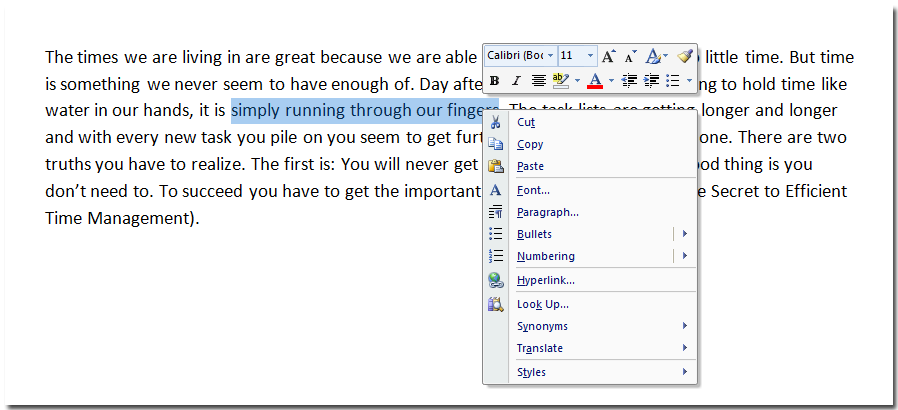
Move to Mouse cursor to the start of the text you want to select then click and hold the left mouse button while moving over the text. Release the mouse button when you are done.

Now you can either right click to select an option from the context menu or use one of the keyboard shortcuts e.g. CTRL + C to copy and CTRL +V to paste the selected text into another document. When you hold CTRL you can select another piece of text at the same time.

 right click context menu

Using the keyboard to select text in Word

Place the cursor in front of the first word of the text you want to select and the press and hold SHIFT while you use right arrow key to highlight letter for letter.  Pressing and holding SHIFT + CTRL at the same time lets you select word by word. The table below lists a couple of useful combinations.

To select text from the cursor to the Press 
end of the line CTRL + END
beginning of the line CTRL + HOME
end of the document SHIFT+CTRL+END
beginning of the document  SHIFT+CTRL+HOME
beginning of the next word SHIFT+CTRL+RIGHT ARROW
beginning of the current word SHIFT+CTRL+LEFT ARROW

Related Posts:

November 17th, 2012|Tags: , |

Shortcut to change font size in Word, Powerpoint, and Outlook

You can increase the font size of a selected text by pressing CTRL and “]”  (CTRL + ]) and decrease it by pressing CTRL and “[” (CTRL + ]). Alternatively you can also use CTRL and “>” or CTRL and “<“, but for this you need to press CTRL + SHIFT + , to increase the font size or CTRL + SHIFT + . to decrease it. The table probably makes it clearer


Keyboard shortcut to change font size in Word

Effect Press (option 1) Press (option 2)
Increase font size CTRL + ] CTRL + SHIFT + .
Decrease font size CTRL + [ CTRL + SHIFT + ,

Please note that these don’t work in Excel


Related Posts:

How to make a screenshot of the active window only

Problem:

You want to take a screenshot of the active window? With the known CTRL + PRINT SCREEN you can only take a screenshot of the entire screen and then would have to to waste time copying  the screenshot into a photo editing software and cutting out the desired window. Don’t waste your time! No need for the snipping tool, either.

Solution:

Simply press ALT + PRINT SCREEN to take a screen copy of only the active window. You can then copy the image of the window by pressing CTRL + V into any open Office application, the Paint program, or after creating a correctly sized new empty image with CTRL + N into Photoshop and more.


For more shortcuts please also read:

Quick reference for Windows keyboard shortcuts

Microsoft Office shortcuts


October 10th, 2012|Tags: , , |

How to get rid of click sounds in Windows Explorer

Are you driving these Windows Explorer click sounds crazy? It doesn’t make sense to mute your PC just because you opened the Win Explorer. You can get rid of them easily and forever.


Windows 7 and Vista

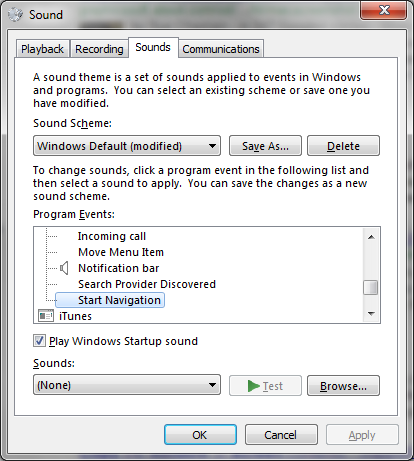
In the Sound options window scroll down to Windows Explorer select Start Navigation and in the menu to sounds choose None (top). Save and that is it. No more clicking sounds

Win7 Sound window

How to get there?

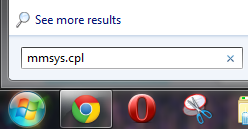
A) The shortest route is to enter “mmsys.cpl” in the Menu search box:

mmsyscplB) You can also enter “sound” in the menu search box, which is probably easier to remember but gives more results.

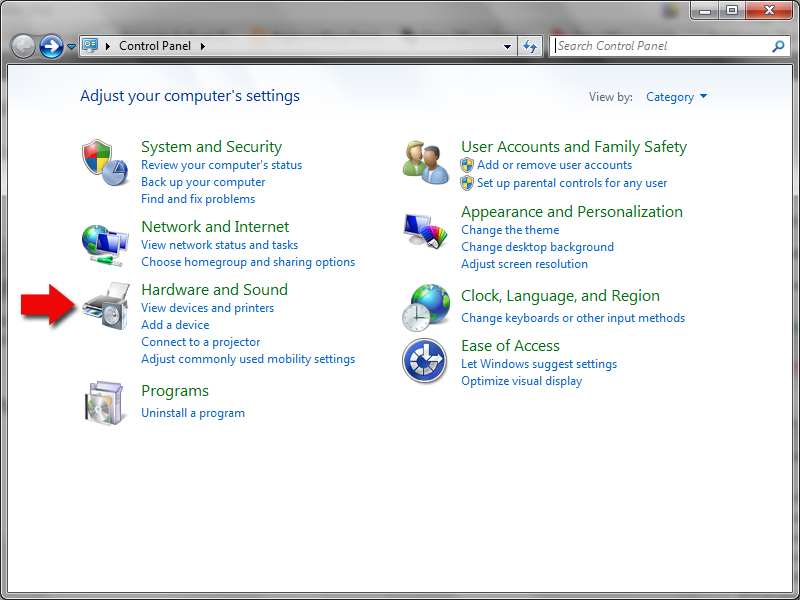
C) The old fashioned method would be to go over Control panel -> Hardware and Sound -> Sound

Control panel

Hardware and SoundNo matter how you get there, but this is the way to correctly stop these pesky click sounds from driving you nuts.


Windows XP

Want to get rid of click sounds of Windows Explorer in Windows XP? Here is how.

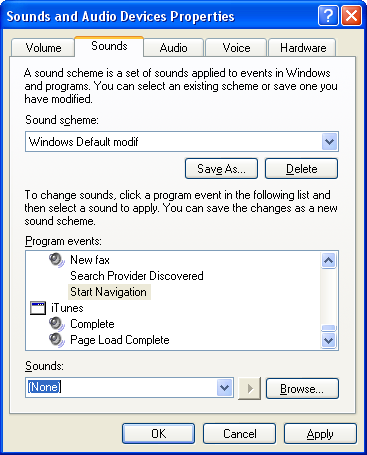
Under Windows XP you need to go to “Sounds and Audio Devices Properties”, select the Sounds tab and scroll down to Windows Explorer, select Start Navigation and assign (no sound) which should be on top of the list.

Sounds_XP

How to get there?

Start -> Control Panel -> Sounds and Audio Devices (Classic view)

or in Category view : Sounds, Speech, and Audio Devices -> Sounds and Audio Devices


October 5th, 2012|Tags: , , |

Excel cells do not add up correctly

I just ran into this quite silly problem. Well it seams trivial if you know how it was caused. I was copying pasting thousands of numbers from one Excel sheet to another, when I realized that the Excel cells do not add up correctly. In other words the sum was simply wrong.

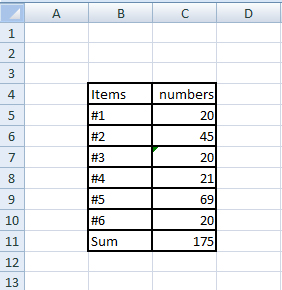
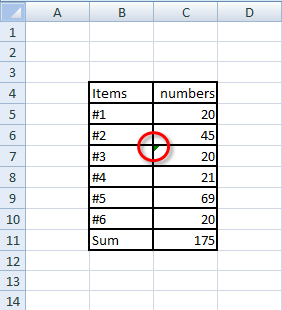
So with a very much reduced number of cells this is how it looks:

Sum not correct

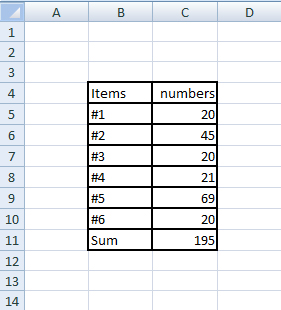
The sum for items #1 to #6 should actually be 195 instead of 175. Here it seems obvious because the little triangle in one of the cells already points to an irregularity, but that is not so easily detected with 75% zoom and a spreadsheet full of information and these lines did’t help either.

Sum not correct-triangle

a) Click on it and select “Convert to Number“.
Alternatively you can of course highlight the cell and
b) change it from text to number under Home -> Number, or
c) press “CTRL + SHIFT + ! ” to format the cell to number format with commas

Now it is correct:

Excel sum correct

So the best is simply to highlight all cells in the column or row and make sure they are in the desired number format.


September 24th, 2012|Tags: , |
Go to Top